An old metal filing cabinet, though sturdy and functional, can often be an eyesore, clashing with your meticulously curated office décor or simply showing the wear and tear of years of service. But before you banish it to the recycling bin, consider giving it a fresh lease on life with a coat of paint. This isn’t just about aesthetics; a new paint job can also protect the metal, prevent rust, and extend the cabinet’s lifespan, transforming a utilitarian piece into a vibrant, integrated part of your workspace. Whether you’re aiming for a sleek modern look, a bold accent, or a vintage charm, painting your metal filing cabinet is a rewarding DIY project that can significantly elevate your environment. With the right tools, preparation, and technique, you can achieve a professional-looking finish that will make your old cabinet feel brand new.
Understanding Your Canvas: What is a Metal Filing Cabinet?
A metal filing cabinet is a robust piece of office furniture designed for securely storing documents and other office essentials. Typically constructed from steel, these cabinets are renowned for their durability and fire resistance, making them a cornerstone in many professional settings. Over time, their utilitarian grey or beige finish can become dull, scratched, or even rusty.
These cabinets come in various forms, primarily categorized by their drawer configuration and size. Common types include:
- Vertical Filing Cabinets: Taller and narrower, with drawers extending from the shorter side.
- Lateral Filing Cabinets: Wider, with drawers extending from the longer side, often preferred for larger documents and accessible layouts.
- Mobile Filing Cabinets: Equipped with casters for easy movement, ideal for flexible workspaces or under-desk storage.
The primary material is usually cold-rolled steel, which is strong but susceptible to rust if its protective coating is compromised. Understanding these characteristics is crucial when selecting paints and preparing the surface for a lasting finish.
Essential Tools and Materials for Your Cabinet Makeover
Embarking on a painting project requires more than just a can of paint. Gathering the right supplies beforehand ensures a smooth process and a professional result. Here’s a comprehensive list of what you’ll need:
- Safety Gear:
- Gloves (disposable nitrile or rubber)
- Respirator mask (especially for spray paint fumes)
- Safety glasses
- Cleaning Supplies:
- Degreaser (e.g., Krud Kutter, Simple Green) or mild soap and water
- Microfiber cloths or clean rags
- Wire brush (for rust)
- Rust remover/converter (if dealing with significant rust)
- Sanding Supplies:
- Sandpaper (various grits: 120-150 grit for rust/rough surfaces, 220-320 grit for existing paint/smoothing)
- Sanding block or orbital sander (optional, for larger surfaces)
- Steel wool (for very shiny surfaces)
- Preparation & Taping:
- Screwdriver (to remove hardware)
- Painter’s tape (high-quality, for crisp lines)
- Drop cloths or old newspapers (to protect your workspace)
- Putty knife and metal filler (for dents or dings)
- Primer & Paint:
- Metal-specific primer (rust-inhibiting primer is recommended)
- Paint for metal (spray paint or brush-on/roll-on paint like oil-based enamel or epoxy paint)
- Stirring stick (for brush-on paints)
- Application Tools:
- High-quality spray paint cans (if opting for spray painting)
- Foam rollers (small size, for smooth finishes with brush-on paint)
- Paint brushes (good quality, for corners and details, if not using spray paint)
- Finishing Touches (Optional):
- Clear protective topcoat (for added durability)
- Paste wax (if using chalk paint)
Setting Up Your Workspace for Success
Before any paint touches the cabinet, creating a proper work environment is paramount for both safety and the quality of your finish. Good preparation here can save you a lot of trouble later.
First, select a well-ventilated area. If possible, work outdoors on a calm, dry day. If indoors, choose a garage or a spacious room with open windows and doors, ensuring good airflow. Use fans to help circulate air, but avoid creating a dusty environment. This ventilation is crucial, especially when using aerosol spray paints, to disperse harmful fumes.
Next, protect your surroundings. Lay down drop cloths, old sheets, or large pieces of cardboard to cover the floor and any nearby furniture or walls you don’t want to get paint on. Overspray can travel further than you think! If working outdoors, be mindful of wind, as it can carry paint mist or dust onto your wet surface.
Ensure you have adequate lighting to spot imperfections and ensure even coverage. A brightly lit area helps prevent missed spots or uneven application, which are common culprits for a less-than-perfect finish. Finally, organize your tools and materials within easy reach to streamline the process once you begin.
Step-by-Step DIY Guide to Painting Your Metal Filing Cabinet
Transforming your old filing cabinet is a methodical process. Rushing any step can compromise the final outcome. Follow these detailed steps to achieve a smooth, durable, and attractive finish.
1. Disassemble and Clean
|
Our Picks for the Best Filing Cabinet in 2026
As an Amazon Associate I earn from qualifying purchases.
|
||
| Num | Product | Action |
|---|---|---|
| 1 | 2 Drawer Small File Cabinet with Lock, Farmhouse Vertical Filing Cabinet Fits Letter and A4 Size, Under Desk Wooden File Cabinets for Home Office, Printer Stand, Rustic White |

|
| 2 | 3 Drawer Small File Cabinet with Wheels, Farmhouse Vertical Filing Cabinet Fits Letter/A4 Size, Rolling File Cabinets Wooden Printer Stand for Home Office, Rustic White |
|
| 3 | VASAGLE 2-Drawer File Cabinet, Small Rolling Filing Cabinet for Home Office, Printer Stand, for A4, Letter-Size Documents, 15.7 x 16.5 x 27.6 Inches, Ink Black UOFC040B16 |
|
| 4 | 3 Drawer Tall File Cabinet with Wheels, Farmhouse Vertical Filing Cabinet Fits Letter/A4 Size, Rolling File Cabinets Wooden Printer Stand for Home Office, Rustic White |
|
| 5 | Letaya 3 Drawer Mobile File Cabinet with Lock,Under Desk Metal Filing Cabinets for Home Office Organizer Letters/Legal/A4((Fully Assembled-Black) |
|
| 6 | Lorell NuSparc 3 Drawer Locking Filing Cabinet | Pre-Assembled Steel Construction | Space-Saving Design is Perfect for Home and Small Office | Letter-Size | Assembled in North America |
|
| 7 | VASAGLE 2 Drawers File Cabinet with Lock, Printer Stand, Office Filing Cabinet Organizer, for A4 and Letter Size Documents, Ink Black UOFC061B16 |
|
| 8 | HOOBRO 2 Drawer File Cabinet with Lock, Under Desk Mobile Filing Cabinet for Home Office, Wooden Farmhouse Office Storage Cabinet, Printer Stand Fits Letter and A4 Size, Walnut and White WH66WJ01 |
|
| 9 | 2 Drawer Locking Filing Cabinet | Pre-Assembled Steel Construction | Space-Saving Design is Perfect for Home and Small Office | Letter-Size | Assembled in North America |
|
| 10 | VASAGLE 2-Drawer File Cabinet, Small Rolling Filing Cabinet for Home Office, Printer Stand, for A4, Letter-Size Documents, 15.7 x 16.5 x 27.6 Inches, Snow White UOFC040W46 |
|
Begin by emptying the cabinet entirely. Remove all drawers, handles, locks, and any other removable hardware. If any hardware is not removable, carefully cover it with painter’s tape to protect it from paint. Labeling drawers or hardware can simplify reassembly later.
Next, give the cabinet a thorough cleaning. Use a degreaser or a mixture of warm water and mild dish soap to wipe down all surfaces. Metal cabinets often accumulate grease, grime, and dust, which can prevent paint from adhering properly. Scrub well, paying attention to corners and edges. Rinse thoroughly with clean water and allow the cabinet and drawers to dry completely. Any residual moisture can cause adhesion problems or rust under the new paint.
2. Address Rust and Imperfections
Inspect the cabinet for any signs of rust. If present, it’s crucial to treat it before painting. Use a wire brush or coarse-grit sandpaper (120-150 grit) to remove loose or flaking rust and paint. For stubborn rust spots, apply a rust remover or converter, following the product’s instructions. These products chemically stabilize the rust, preventing it from spreading beneath your new paint job.
Once rust is addressed, look for dents, dings, or deep scratches. Use a metal filler or auto body filler to patch these imperfections. Apply it with a putty knife, smooth it out, and allow it to dry completely according to the manufacturer’s directions. This step creates a flawless surface for painting.
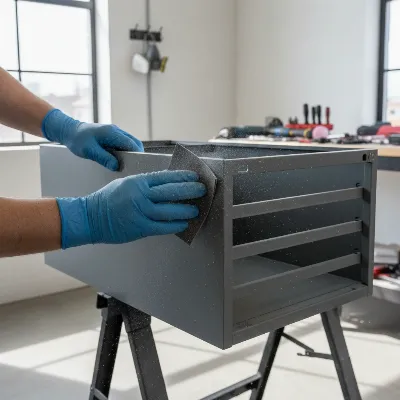 A person sanding an old metal filing cabinet to prepare it for painting, showing removed drawers and a well-ventilated workspace.
3. Sand for Adhesion
Sanding is a non-negotiable step, even if your cabinet appears clean. It creates a “tooth” for the primer and paint to grip onto, ensuring excellent adhesion and a long-lasting finish.
- For previously painted surfaces in good condition: Lightly sand the entire cabinet and drawers with fine-grit sandpaper (220-320 grit). This scuffs the existing finish, allowing the new paint to bond better.
- For bare metal or after rust removal/filling: Use a medium-grit sandpaper (120-150 grit) to rough up the surface. If the surface is very shiny, steel wool can also be used to create texture.
After sanding, wipe down all surfaces with a clean, damp cloth to remove all dust and debris. A tack cloth can be particularly effective for picking up fine particles. Let it dry completely before moving on.
4. Prime the Surface
Applying a primer specifically designed for metal is a critical step, especially if you’ve dealt with bare metal, rust, or are changing the color dramatically. Primer serves several vital functions: it promotes adhesion, prevents rust, and provides an even base for your topcoat.
If using spray primer, shake the can vigorously for at least one minute. Hold the can 8-12 inches away from the surface and apply a thin, even coat using a smooth, sweeping motion. Overlap each pass by about one-third to ensure consistent coverage. Don’t try to achieve full coverage in one go; multiple thin coats are always better than one thick, drip-prone layer.
If using a brush-on primer, use a small foam roller for large flat areas and a brush for corners and edges to minimize brush marks.
Allow the primer to dry completely according to the manufacturer’s instructions, typically 1-2 hours. You may need a second coat of primer for optimal results, especially if the original finish was dark or uneven. Lightly sand with 320-grit sandpaper between primer coats for an even smoother finish, then wipe away any dust.
> “The secret to a flawless metal paint job isn’t the paint itself, but the meticulous preparation underneath. Skipping cleaning, sanding, or priming is a direct route to a peeling, lackluster finish.” – Sarah Jenkins, Professional Furniture Refinisher
5. Apply the Topcoat
Now for the color! Choose a paint specifically formulated for metal, such as an oil-based enamel, epoxy paint, or a high-quality spray paint for metal, which often includes rust inhibitors.
- For Spray Paint: Shake the can well. Maintain a consistent distance (8-12 inches) from the surface and use light, even, sweeping motions. Start spraying off the cabinet, move across, and release the trigger off the other side. This “on/off” technique prevents heavy spots and drips. For best results, paint horizontal surfaces first if possible, letting them semi-dry before turning to paint vertical sides to combat gravity and prevent runs. Apply 2-3 thin coats, allowing each coat to dry to the touch (usually 10-30 minutes, check product label) before applying the next. Avoid applying too much paint at once, as this will lead to drips and an uneven finish.
- For Brush-on/Roll-on Paint: Use a foam roller for large, flat areas to achieve the smoothest finish, minimizing brush strokes. Use a good quality brush for edges and detailed areas. Apply thin, even coats, ensuring full coverage without overworking the paint. Allow each coat to dry completely before applying the next, which can take several hours depending on the paint type and humidity. Typically, 2-3 coats are needed for full opacity.
6. Allow for Curing and Reassembly
Once your final coat of paint is applied, the most crucial step is patience. While the paint may feel dry to the touch within a few hours, it needs time to “cure” – meaning it hardens completely. This curing process can take anywhere from 24 hours to several days, or even a week, depending on the paint type and environmental conditions. Refer to your paint can’s instructions for specific curing times.
During the curing period, avoid heavy handling or placing objects on the cabinet to prevent scratches, nicks, or marring of the new finish. Once fully cured, carefully reattach the handles, locks, and drawers. If you added a decorative top like contact paper or custom labels, now is the time to apply them.
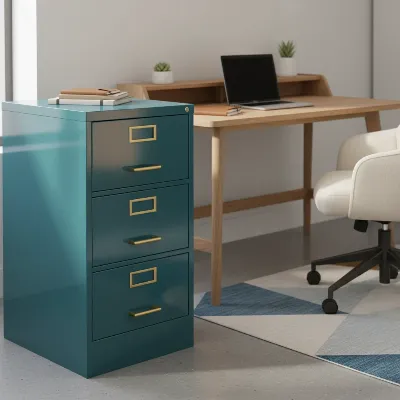 A beautifully painted metal filing cabinet in a modern office setting, showcasing its refreshed appearance and functional elegance.
Common Painting Problems and How to Avoid Them
Even with careful planning, painting projects can sometimes encounter hiccups. Knowing common issues and how to prevent them can save you time and frustration.
Drips and Runs
These occur when too much paint is applied in one area or the coats are too thick.
Prevention: Always apply thin, even coats. When using spray paint, keep the can moving and maintain a consistent distance. For brush-on paint, avoid overloading your brush or roller. If a drip forms, try to smooth it out immediately with a dry brush or rag. If it dries, you’ll need to sand it down and repaint.
Uneven Coverage or Streaks
This often happens due to insufficient paint, improper application technique, or uneven surface preparation.
Prevention: Ensure the surface is uniformly sanded and primed. Apply enough coats of paint, allowing each to dry completely. For spray paint, overlap your passes consistently. For brush-on paint, use a quality foam roller to minimize streaks and ensure even application.
Peeling or Chipping Paint
The most common cause of paint failure on metal surfaces is poor adhesion, often stemming from inadequate surface preparation.
Prevention: Never skip cleaning, degreasing, or sanding. Rust and old, loose paint must be completely removed. Always use a metal-specific primer to create a strong bond between the cabinet and the paint. Ensure all surfaces are dry before painting.
Bubbles or Blistering
These typically form when paint is applied over a wet or oily surface, or when solvent vapors get trapped underneath a thick paint layer. Painting in direct sunlight can also cause paint to dry too quickly on the surface, trapping solvents.
Prevention: Thoroughly clean and dry the cabinet before painting. Apply thin coats and allow adequate drying time between each. Avoid painting in direct, hot sunlight or in highly humid conditions.
Rough or Textured Finish
This can be caused by dust settling on wet paint, using dirty tools, or inadequate sanding.
Prevention: Work in a dust-free environment. Wipe down surfaces with a tack cloth before each coat. Use clean, high-quality brushes and rollers. If a rough finish occurs, light sanding with fine-grit sandpaper after the paint has cured, followed by a light topcoat, can sometimes rectify it.
Creative Ideas for Your Painted Filing Cabinet
Beyond a simple color change, a painted filing cabinet offers a canvas for endless creativity, allowing you to personalize your workspace further.
- Two-Tone Designs: Paint the body one color and the drawer fronts a contrasting or complementary shade. This creates visual interest and can make a large cabinet feel less monolithic.
- Geometric Patterns: Use painter’s tape to create stripes, chevron patterns, or other geometric designs. This is a fantastic way to add a modern, artistic touch.
- Distressed or Vintage Look: For a rustic or antique aesthetic, apply a base coat, then a topcoat in a contrasting color. Once dry, lightly sand areas where natural wear would occur (edges, corners) to reveal the base coat. A clear wax can then seal the finish.
- Magnetic Surface: Use magnetic primer before your topcoat to turn the cabinet into a giant magnetic board, perfect for displaying notes, photos, or small art pieces.
- Functional Art: Consider adding stencils, decals, or even hand-painted designs to transform your cabinet into a unique art piece that reflects your personality.
- Integrated Storage: Attach magnetic containers or small shelves to the sides of the cabinet for extra storage of pens, clips, or plants, blending functionality with style.
By thinking outside the box, your once-dull filing cabinet can become a statement piece that enhances both the utility and beauty of your office.
Conclusion
Painting an old metal filing cabinet is more than just a renovation; it’s an act of transformation. It’s about breathing new life into a functional but often overlooked piece of furniture, turning it into something that truly complements your space and reflects your style. By following these detailed steps—from meticulous cleaning and surface preparation to careful priming and precise paint application—you can achieve a durable and beautiful finish that looks professionally done. Remember, patience is your greatest tool, especially during the drying and curing stages.
So, are you ready to pick up that paintbrush and reimagine your Filing Cabinet?